Introducing Gradle Build Cache Beta
Table of Contents
Introduction
Introduced in Gradle 3.5 to reduce build time.
What does it do? #
The build cache reuses the outputs of Gradle tasks locally and shares task outputs between machines. In many cases, this will accelerate the average build time.
The build cache is complementary to Gradle’s incremental build features, which optimizes build performance for local changes that have not been built already. Many Gradle tasks are designed to be incremental, so that if the inputs and outputs of the task do not change, Gradle can skip the task. Even when the task’s inputs have changed, some tasks can rebuild only the parts that have changed. Of course, these techniques only work if there are already outputs from previous local builds. In the past, building on fresh checkouts or executing “clean” builds required building everything from scratch again, even if the result of those builds had already been created locally or on another machine (such as the continuous integration server).
Now, Gradle uses the inputs of a task as a key to uniquely identify the outputs for a task. With the build cache feature enabled, if Gradle can find that key in a build cache, Gradle will skip task execution and directly copy the outputs from the cache into the build directory. This can be much faster than executing the task again.
In particular, if you’re using a continuous integration server, you can configure Gradle to push task outputs to a shared build cache. When a developer builds, task outputs already built on CI are copied to the developer’s machine. This can greatly improve the developer’s local build experience.
When using the local build cache, instead of rebuilding large parts of the project whenever you switch branches, Gradle can skip task execution and pull the previous outputs from the local cache.
How does it work? #
A cacheable Gradle task is designed to declare everything that can affect the output of the task as an input. Gradle calculates a build cache key by hashing over all of the inputs to a task. That build cache key uniquely identifies the outputs of the task. This is an opt-in feature for each task implementation, so not every task is cacheable or needs to be. Several built-in Gradle tasks (JavaCompile, Test, Checkstyle) have caching enabled to speed up the typical Java project.
The build cache key for a task takes into account:
- The values of all inputs defined by the task via annotations (e.g.
@InputFiles) or the runtime TaskInputs API. - The contents (and relative paths) of any file inputs.
- The classpath of the task, which includes any plugins and Gradle version used.
- The classpath of any task actions, which can include the build script.
When the build cache feature is enabled, Gradle will check if any of the configured build caches contain a match for the task’s build cache key when a task is not up-to-date. If Gradle does not find a match, the task will be executed as normal. After execution, Gradle will gather all of the task’s outputs and push them to the build caches, if configured to do so. If Gradle does find a match, the task’s outputs are deleted and the previous outputs are copied into the output directories.
Does it help? #
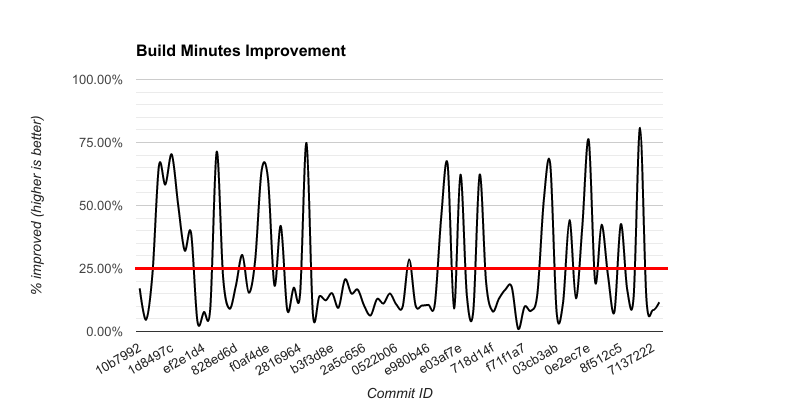
We have been using the build cache for the Gradle CI builds since November 2016. We also have some partners who have been trying the build cache in their builds. We can’t share their data directly, but they’ve seen similar improvements in CI and developer builds as we have. On average, we see a 25% reduction in total time spent building each commit, but some commits are even better (80% reduction) and the median build saw a 15% reduction.
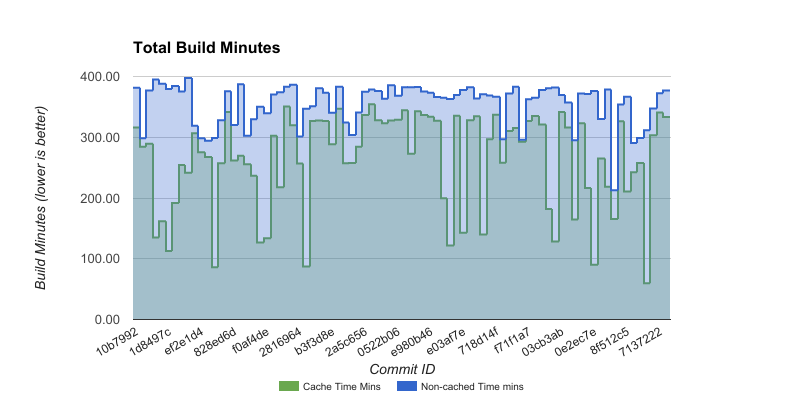
Here’s another look at the number of minutes spent between the cached and non-cached builds for Gradle. You can see how the reductions translates into about 90 minutes saved in a 360 minute build for us.
The build cache is a generic feature that avoids re-executing a task when it can, so builds large and small can benefit in some way. The structure of your project will influence how much you can gain overall. If your project consists of a single monolithic module, Gradle has other features that may also help, such as incremental compilation or composite builds. We’ll provide more information about how to get the most out of the build cache in a future blog post and at the Gradle Summit.
Make your build faster today #
The Gradle 3.5 release is the first release to include the build cache feature.
We expect that the build cache feature will have general availability in the next release, but we would like for every project to give the build cache beta a try. To do that, we’d like you to try 3 things for us.
1) Try it on a simple project #
After upgrading to 3.5, pick a simple Java project and run:
gradle --build-cache clean assemble
gradle --build-cache clean assemble
The second build should be faster because some task outputs are reused from the first build. These outputs will be pulled from your local build cache, which is located in a directory in your GRADLE_USER_HOME.
2) Try to share outputs between machines #
To use a shared, remote cache, we provide a recommended configuration that uses your continuous integration builds to populate a shared build cache and allows all developers to pull from that build cache.
You’ll need a remote build cache backend to share between developers. We provide a build cache node docker image which operates as a remote Gradle build cache, and can connect with Gradle Enterprise for centralized management. The cache node can also be used without a Gradle Enterprise installation with restricted functionality.
3) Give us feedback #
If you have feedback, we’d love to hear it. If you have a build scan you can share, that’s even better.
We’re excited to get the Gradle Build Cache feature out for feedback in Gradle 3.5, but we know there’s more we need to do to make the build cache stable and performant. We have some known issues that you should check before raising new issues on GitHub.
At this time, we don’t recommend that you leave the build cache enabled for production builds without understanding the risks. There are known issues that can cause your builds to fail or produce incorrect output, but your feedback on the types of problems or successes are very valuable to maturing the build cache feature. You can configure the build cache in your build and enable it on a trial basis by setting org.gradle.caching=true or running with --build-cache without impacting all builds.
For dogfooding the build cache for Gradle, we used a separate CI job to run a build with the build cache enabled. This allowed us to compare the build times with and without the build cache for the same set of changes.
Thanks and roadmap #
After trying the build cache, you’ll probably have some questions about why more parts of your build are not cacheable. Regardless of the build cache backend you are using, Gradle Enterprise 2017.2 comes with features to understand build cache usage and behavior by collecting data, whether the build cache is enabled or not. Build scans keep track of the reason that a task was not cached. A task might not be cached if it has particular problems, like if it has no outputs or cacheability is not enabled for it. You can search the build scan timeline for each of these reasons.
In future versions of Gradle and Gradle Enterprise, we’ll collect more information related to the build cache and task cacheability, to make it easier to diagnose build failures or poor build cache performance.
For the next release, Gradle 4.0, we intend to focus on making the build cache safe to enable for all well behaved builds and providing feedback for situations where Gradle cannot safely cache outputs from a task. This also means we’ll be providing a well-behaved local build cache and several validation checks.
For the releases following that, we intend to spend time on expanding our documentation and Gradle guides to make it easier for you to cache more tasks and develop cache-friendly tasks.
Thanks for your continued help and support. Please consider making your build faster with the build cache with the three steps we outline above.