Introducing Test Suites
Table of Contents
Introduction
As projects grow in size and complexity and otherwise mature, they tend to accumulate a large collection of automated tests. Testing your software at multiple levels of granularity is important to surface problems quickly and to increase developer productivity.
In Gradle 7.3, released November 2021, the Gradle team introduced a new feature called Declarative Test Suites. Using this feature makes it much easier to manage different types of tests within a single Gradle JVM project without worrying about low level “plumbing” details.
Why Test Suites? #
Normally - whether or not you’re practicing strict Test Driven Development - as you develop a project you will continuously add new unit tests alongside your production classes.
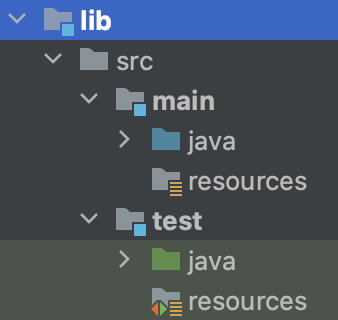
By convention, for a Java project, these tests live in src/test/java:
These unit tests ensure your classes behave correctly in isolation from the very beginning of your project’s lifecycle. At some point later in development, you will be ready to test how your classes work together to create a larger system using integration tests. Later still, as a final step in certifying that your project works as designed, you will probably want to run the entire system in end-to-end tests which check functional requirements, measure performance, or otherwise confirm its readiness for release.
There are a lot of error-prone details you need to consider in this process. Test Suites was created to improve this situation, in response to the hardships detailed below.
Considerations when setting up additional tests #
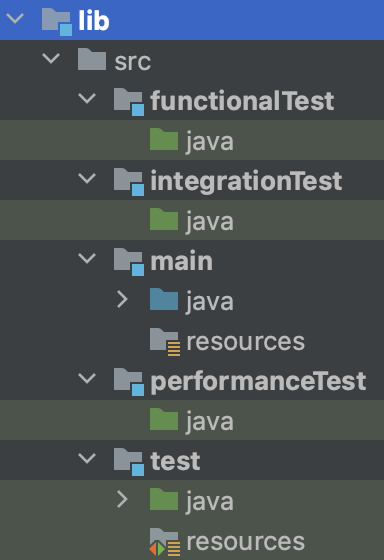
Varied test goals often involve different and incompatible patterns. At a minimum you’ll want to organize your test code by separating tests into different directories for each goal:
But separating the source files is only the beginning. These types of tests might require different preconditions to be met prior to testing, utilize entirely different runtime and compile time dependencies, or interact with different external systems. The very testing framework (such as JUnit 4 or 5, TestNG or Spock) used to write and run each group of tests could be different.
To correctly model and isolate these differences in Gradle, you’ll need to do more than just separate the tests’ source files. Each group of tests will require its own:
- Separate
SourceSet, that will provide a distinctConfigurationfor declaring dependencies for the group to compile and run against. You want to avoid leaking unnecessary dependencies across multiple groups of tests, yet still automatically resolve any shared dependencies needed for test compilation and execution. - Support for using different testing frameworks to execute the tests in each group.
- A
Testtask for each group which might have different task dependencies to provide setup and finalization requirements. You also may want to prevent every type of test from running every time you build the project (for instance, to save any long-running smoke tests for when you think you’re ready to publish).
Each component you create in your build scripts to support these requirements must be properly wired into the Gradle project model to avoid unexpected behavior. Accomplishing this is error-prone, as it requires a thorough understanding of low-level Gradle concepts. It also requires modifications and additions to multiple blocks of the DSL.
That’s hardly ideal; setting up testing is a single concern and the configuration for it should be co-located and easily discoverable within a buildscript.
Wiring integration tests without Test Suites #
It’s helpful to look at a complete example. Before diving in, take a moment to think about how you would create a separate set of integration tests within a project.
Before Gradle 7.2, the proper way to set up integration tests went like this (note that while this example is written in the Gradle Kotlin DSL, the Groovy setup is very similar):
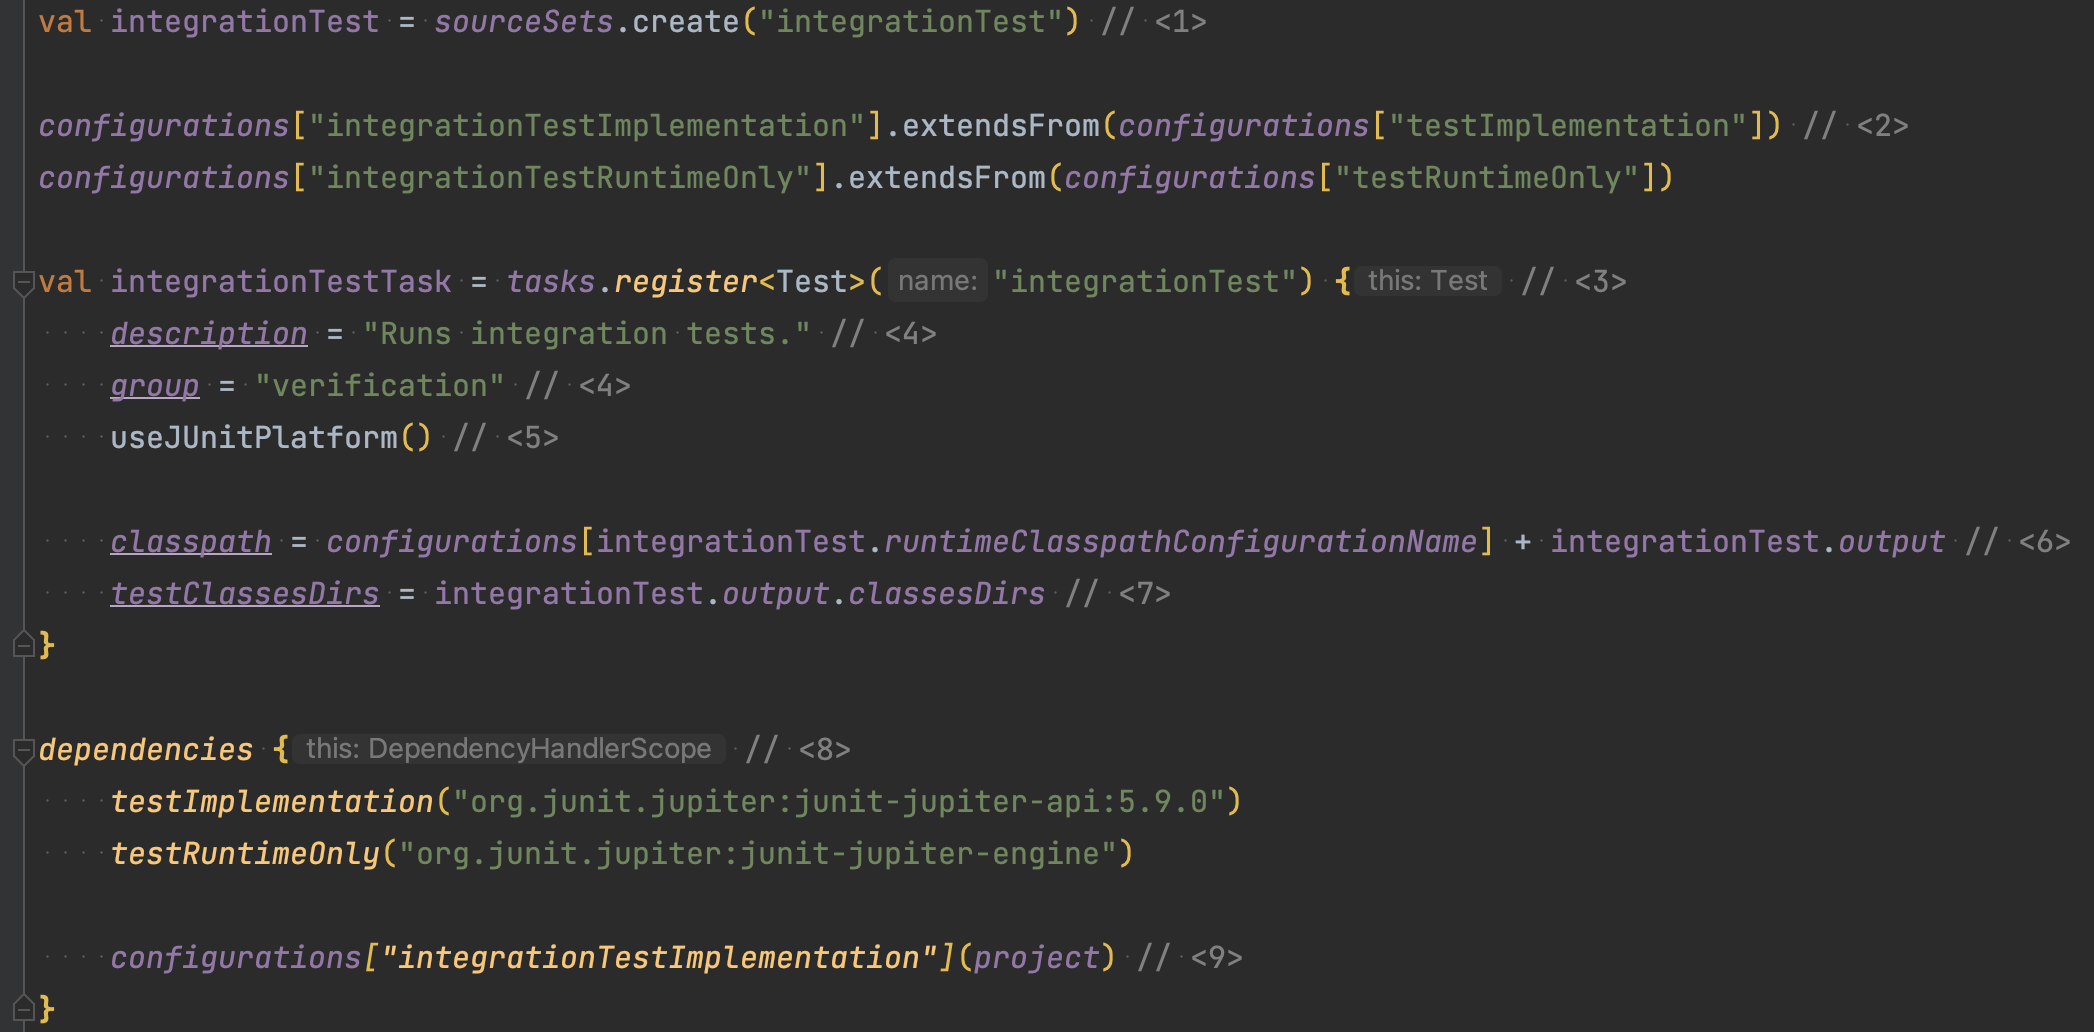
- We need to create a
SourceSetthat will in turn create the associatedConfigurations we’ll need later. This is low-level plumbing that we shouldn’t have to focus on. - We wire the new test configurations to the test existing configurations, to re-use their dependency declarations. We might not always want to do this.
- We need to register a
Testtask to run our tests. - We ought to add the new task to the appropriate group and set a description - not technically necessary, but a best practice to make the task discoverable and properly locate it in reports.
- We will write our tests using the latest version of JUnit 5.
- We need to set up the classpath of our new task - this even more low-level plumbing.
- We need to tell our new task where the classes it runs live.
- Finally, we add the necessary JUnit dependencies to the built-in test configurations, which our new configurations extend.1
- The integration tests have an
implementationdependency on the current project’s production classes - this looks somewhat extraneous in this block that also configures the production dependencies for the project.
Did you get all that?
The bottom line is that this is simply too complex. You shouldn’t have to be a build expert just to set up thorough testing!
Test Suites - a better way forward #
Thinking about the difficulties involved in properly handling this scenario, we realized the current situation was inadequate. We want to support build authors defining multiple groups of tests with different purposes in a declarative fashion while operating at a high level of abstraction. Although you could previously write your own plugin (or use a pre-existing solution such as Nebula) to hide the details of this and mitigate the complexity, testing is such an ubiquitous need that we decided to provide a canonical solution within Gradle’s own core set of plugins. Thus, Test Suites was born.
The JVM Test Suite Plugin provides a DSL and API to model exactly this situation: multiple groups of automated tests with different purposes that live within a
single JVM-based project.
It is automatically applied by the java plugin, so when you upgrade to Gradle >= 7.3 you’re already using Test Suites in your JVM projects.
Congratulations!
Here is the previous example, rewritten to take advantage of Test Suites:
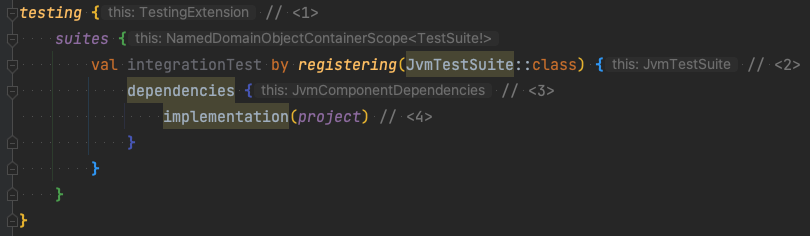
- All Test Suite configuration is co-located within a new
testingblock, of type TestingExtension. - Maintaining backwards compatibility with existing builds that already use the
testtask was an important requirement for us when implementing Test Suites. We’ve associated the existingtesttask with a default Test Suite that you can use to contain your unit tests. - Instead of representing the relationship between unit tests and integration tests by making their backing
Configurations extend one another, we keep the machinery powering two types of tests completely separate. This allows for more fine-grained control over what dependencies are needed by each and avoids leaking unnecessary dependencies across test types.2 - Because each Test Suite could serve very different purposes, we don’t assume they have a dependency on your project (maybe you are testing an external system), so you have to explicitly add one to have access to your production classes in your tests.3
By making use of sensible defaults, Gradle is able to simplify your buildscript significantly.
This script manages to set up a mostly equivalent build as the original but in far fewer lines of code.
Gradle adds a directory to locate your test code and creates the task that run the tests using the suite name as the basis.
In this case, you can run any tests you write located in src/integrationTestJava by invoking gradlew integrationTest.
Test Suites aren’t limited to Java projects, either. Groovy, Kotlin, Scala, and other JVM-based languages will work similarly when
their appropriate plugins are applied. These plugins all also automatically apply the JVM Test Suite Plugin, so you can begin adding tests to src/<SUITE_NAME>/<LANGUAGE_NAME> without doing any other configuration.
Behind the scenes #
This short example takes care of all the considerations of the pre-Test Suites example above.
But how does it work?
When you configure a suite in the new DSL, Gradle does the following for you:
- Creates a Test Suite named
integrationTest(typed as a JvmTestSuite). - Creates an
SourceSetnamedintegrationTestcontaining the source directorysrc/java/integrationTest. This will be registered as a test sources directory, so any highlighting performed by your favorite IDE will work as expected. - Creates several
Configurations derived from theintegrationTestsource set, accessible through the Suite’s owndependenciesblock:integrationTestImplementation,integrationTestCompileOnly,integrationTestRuntimeOnly, which work like their similarly namedtestconfigurations. - Adds dependencies to these configurations necessary for compiling and running against the default testing framework, which is JUnit Jupiter.
- Registers a
Testtask namedintegrationTestwhich will run these tests. The most important difference is that using Test Suites will fully isolate any integration test dependencies from any unit test dependencies. It also assumes JUnit Platform as the testing engine for new test suites, unless told otherwise.4
After adding just this minimal block of DSL, you are ready to write integration test classes under src/integrationTest/java which are completely separate from your unit tests, and to run them via a new integrationTest task.
No contact with low-level DSL blocks like configurations is required.
Try it out now #
Test Suites is still an @Incubating feature as we explore and refine the API, but it’s here to stay, and we encourage everyone to try it out now.
For a new project, the easiest way to get started is to use the Gradle Init task and opt-in to using incubating features when prompted; this will generate a sample project using the new DSL.
Customizing your Suites #
The rationale behind Test Suites, just like Gradle in general, is to abstract the details of configuration and use sensible conventions as defaults - but to also allow you to change those defaults as necessary.
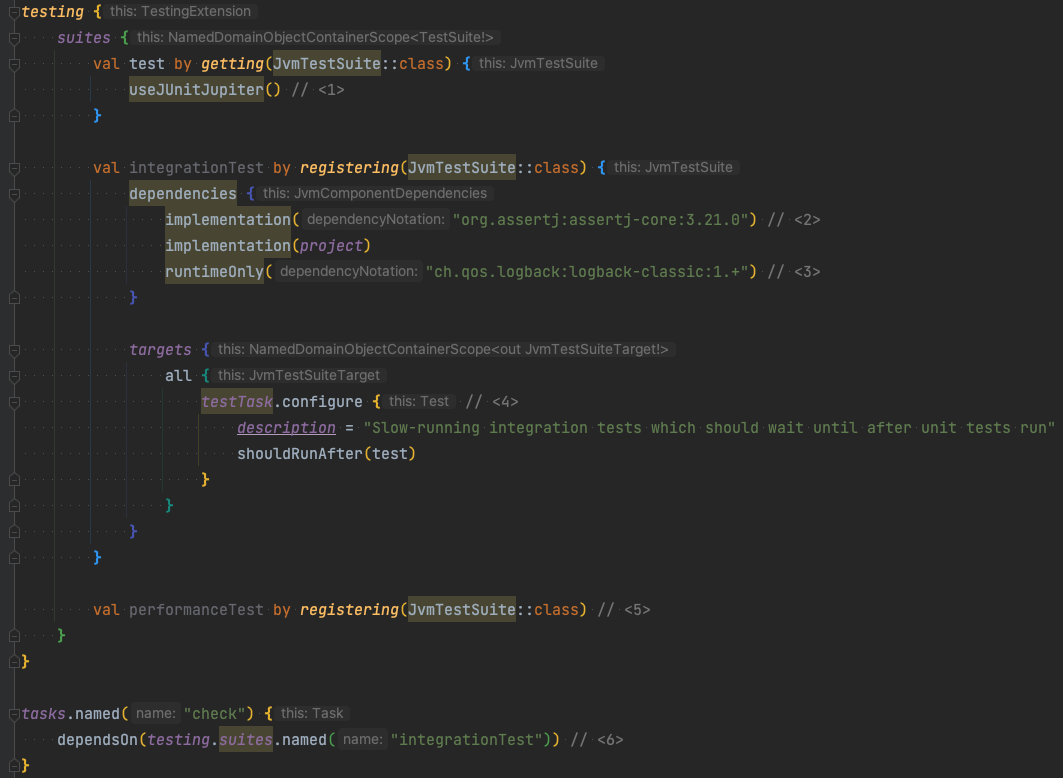
- Configure the built-in Test Suite to use a different testing framework using one of several convenience methods available.5
- Add a non-project dependency for use in compiling and running a Test Suite.
- Add a dependency which is only used when running tests (in this case, a logging implementation).
- Access the
integrationTesttask which will be created for this Suite to configure it directly (and lazily6), within thetestingblock. - Define an additional
performanceTestSuite using the bare minimum DSL for a default new Test Suite. Note that this suite will not have access to the project’s own classes, or be wired to run as part of the build without calling itsperformanceTesttask directly.7 - Suites can be used as task dependencies - this will cause the
checktask to depend on theintegrationTesttask associated with theintegrationTestTest Suite - the same task we configured in <4>.
For more Test Suite custom configuration examples, see the JVM Test Suite Plugin section of the Gradle user guide. For adding an additional test suite to a more complex and realistic build, see the Multi-Project sample.
The future of testing in Gradle #
We have many exciting ideas for evolving Test Suites in the future.
One major use case we want to support is multidimensional testing, where the same suite of tests runs repeatedly in different environments (for instance, on different versions or releases of the JVM).
This is the reason for the seemingly extraneous targets block seen in the examples here and in the user guide.
Doing this will likely involve closer Test Suite integration with JVM Toolchains.
You’ll also definitely want to check out the Test Report Aggregation Plugin added in Gradle 7.4, to see how to easily aggregate the results of multiple Test task invocations into a single HTML report.
Consolidating test failures and exposing more information about their suites in test reporting is another potential area of future development.
These and other improvements are currently being discussed and implemented, so be sure to keep up to date with this blog and the latest Gradle releases.
Happy testing!
-
The version is left off
junit-jupiter-enginebecausejunit-jupiter-apiwill manage setting it - but this might look like a mistake. ↩ -
In the forthcoming Gradle 8.0, this block will use a new strongly-typed
dependenciesAPI, which should provide a better experience when declaring test dependencies in your favorite IDE. Watch our releases page for more details. ↩ -
Note that in the forthcoming Gradle 7.6, instead of using
projectyou’ll need to call the newproject()method here. ↩ -
The default test suite retains JUnit 4 as its default runner, for compatibility reasons. ↩
-
The default test suite is also implicitly granted access to the production source’s implementation dependencies for the same reason. When switching testing frameworks, the new framework’s dependencies are automatically included. ↩
-
See the Lazy Configuration section of the user guide for more details on lazy configuration. ↩
-
Perhaps these tests are meant to exercise a live deployment in a staging environment. ↩