How We Handle Flaky Tests in Gradle
Table of Contents
Introduction
Test flakiness is one of the main challenges of automated testing. Even though Gradle’s focus is increasing developer productivity, the development of Gradle itself suffers from flaky automated tests. This blog explains some best practices when developing Gradle, which have proved effective over the years we fight with flaky tests.
The Story #
Like in many other projects, every commit of Gradle must pass tens of thousands of automated tests. Any tiny flakiness may cause developer productivity loss. When I joined Gradle 5 years ago, the CI was full of flaky test failures - people would rerun a build, again and again, hoping to be lucky enough to get a green build.
Later, we started a dedicated developer productivity team to deal with all the flakiness on CI, especially test flakiness. Here’s how we do it step by step.
Retry Failed Tests #
When a test fails, how do we determine if it’s flaky or not? The easiest way is obviously retrying the failed test immediately: if the second run succeeds, the failed test is flaky. As a rule of thumb, by simply rerunning the failed test one more time, the test failures due to flakiness can be reduced by 90%.
Many CI systems can recognize such flaky tests and mark the build as green automatically:
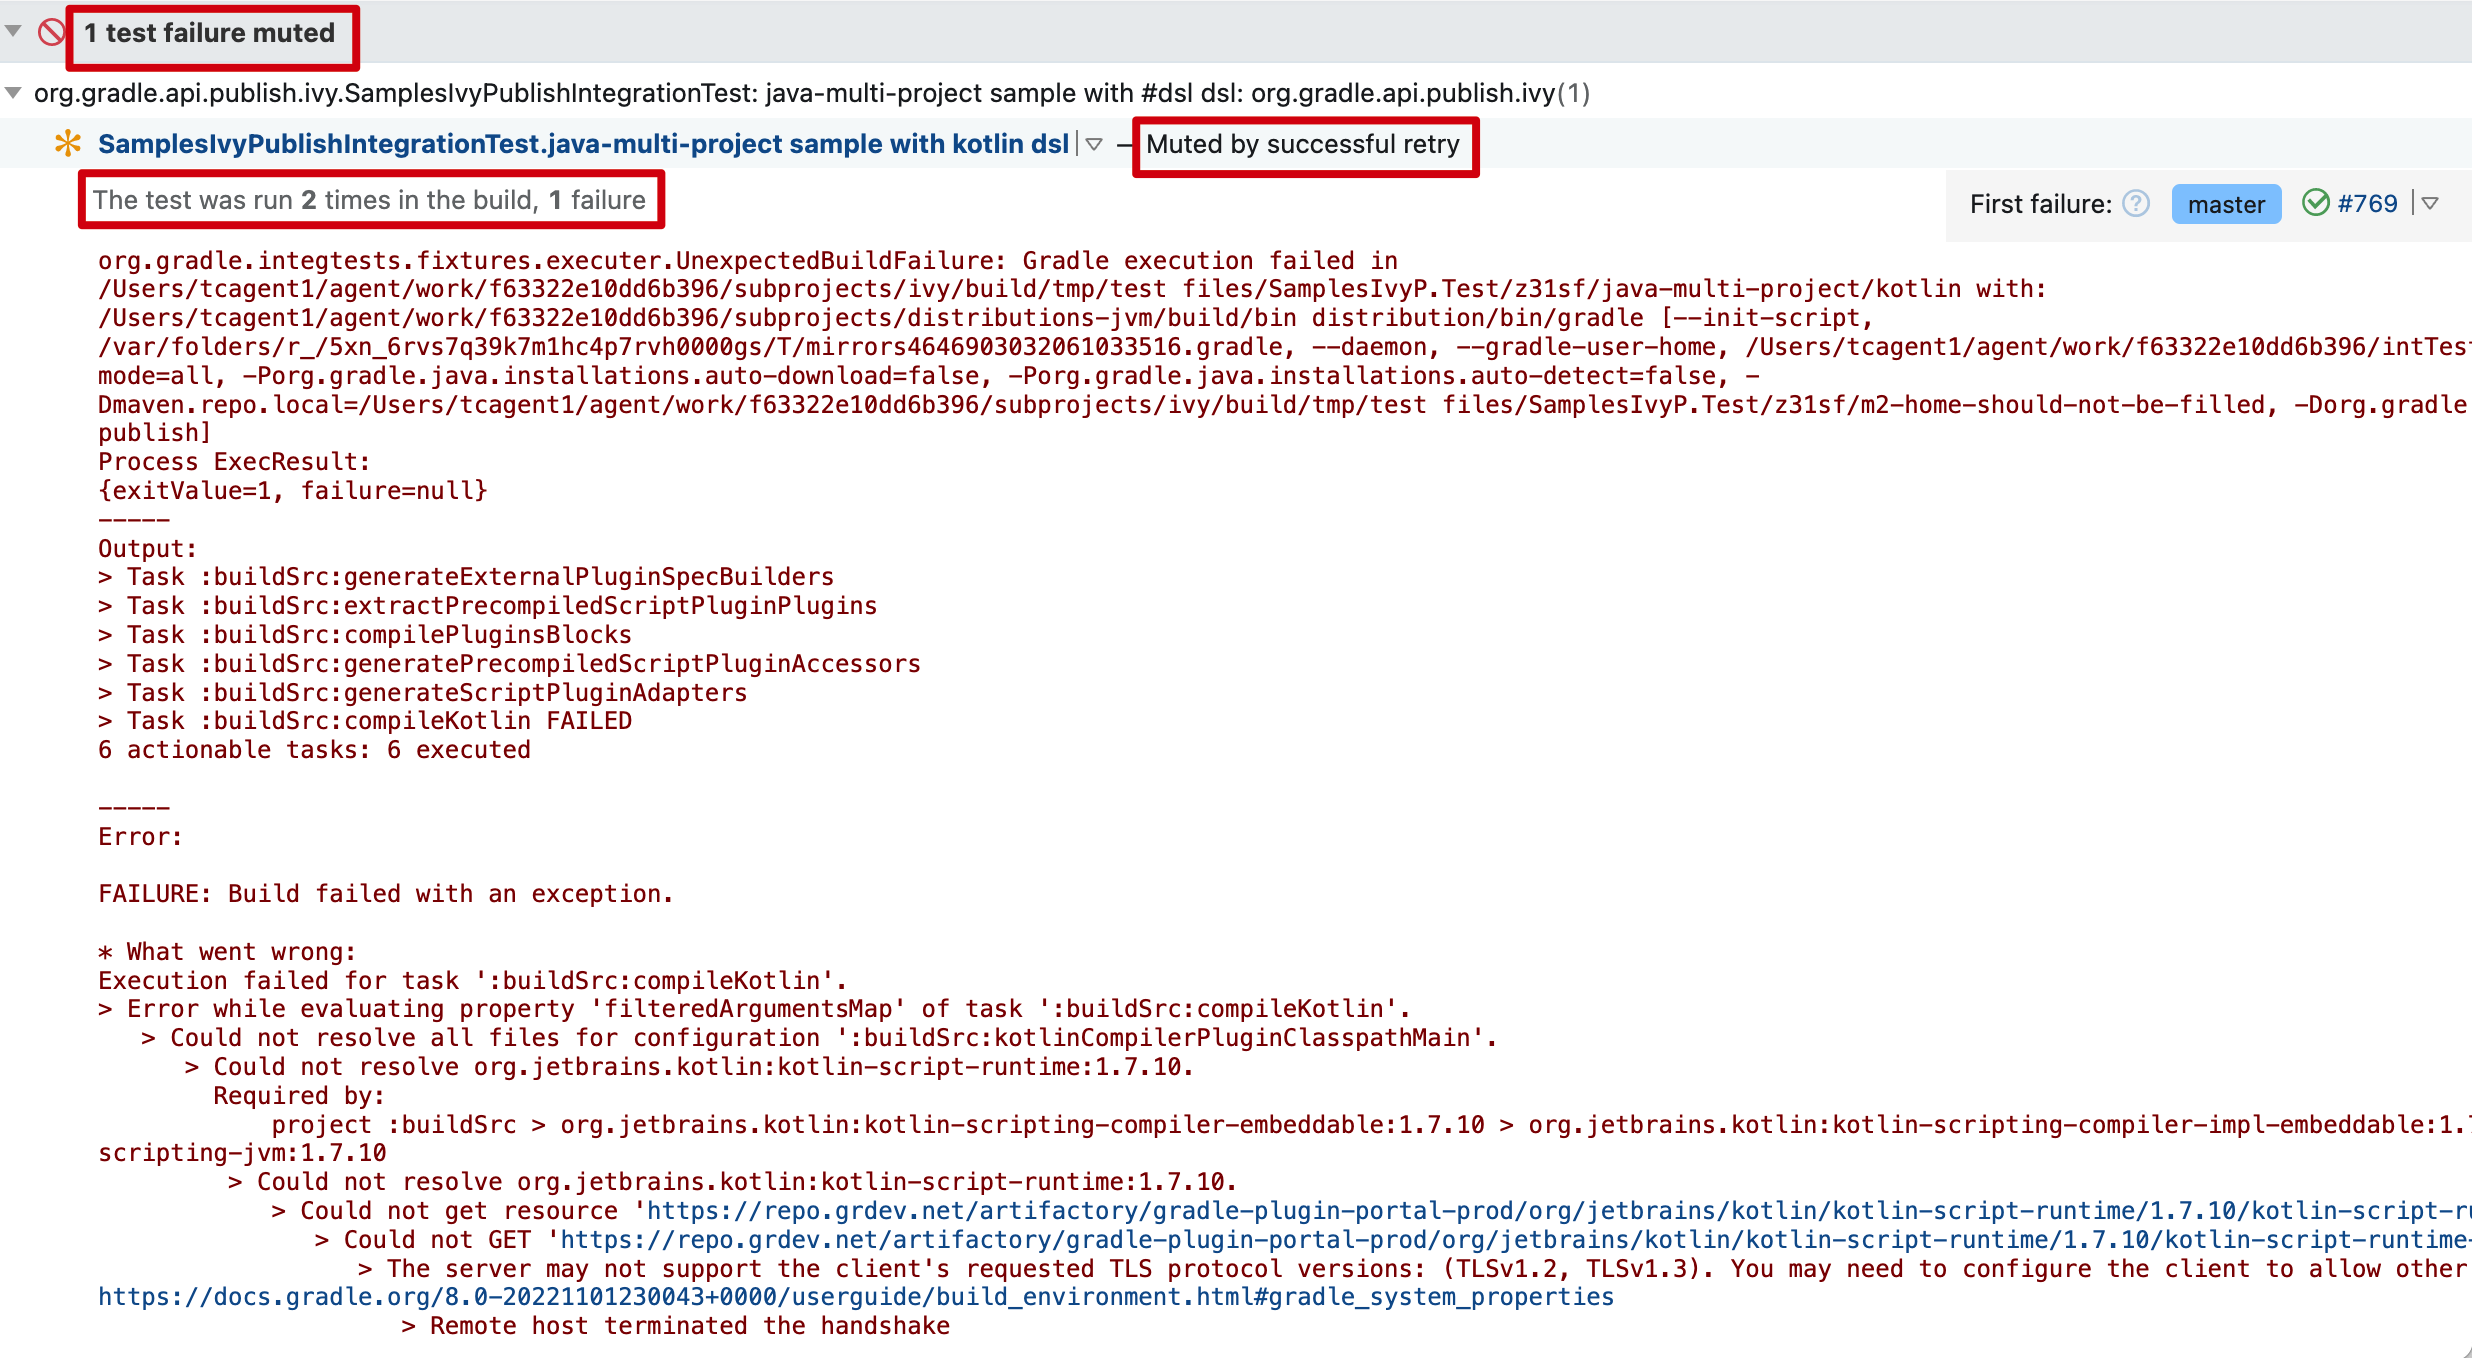
In this example, the first run fails because of a network error, but the rerun succeeds. TeamCity recognizes this situation and “mutes” the test failure.
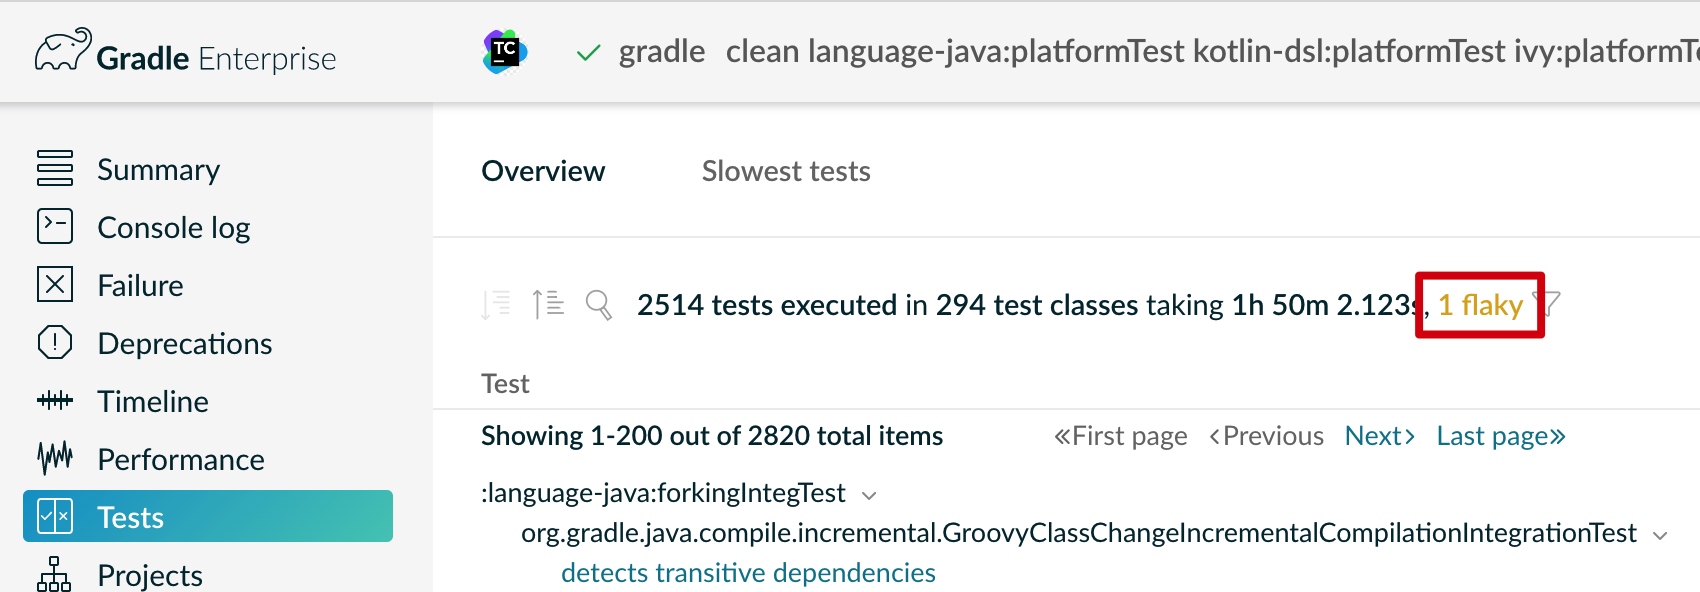
If the build is connected to a Gradle Enterprise instance and that build has a published Build Scan, you can see the flaky tests in the test dashboard:
In Gradle, we automatically retry the failed test classes with the Test Retry Gradle plugin. Please consult the documentation for how to adopt it in your build.
Other Techniques to Retry Failed Tests #
If you are not using Gradle, that’s okay. There are many alternatives that provide similar functionalities:
- Maven Surefire Plugin – Rerun failing tests
- JUnit Pioneer - Retrying Failing Tests
- Bazel
flakyattribute in test rules
All the tools above are supported by Gradle Enterprise Flaky Test Detection, which provides awesome Test Failure Analytics features to help you diagnose the test flakiness.
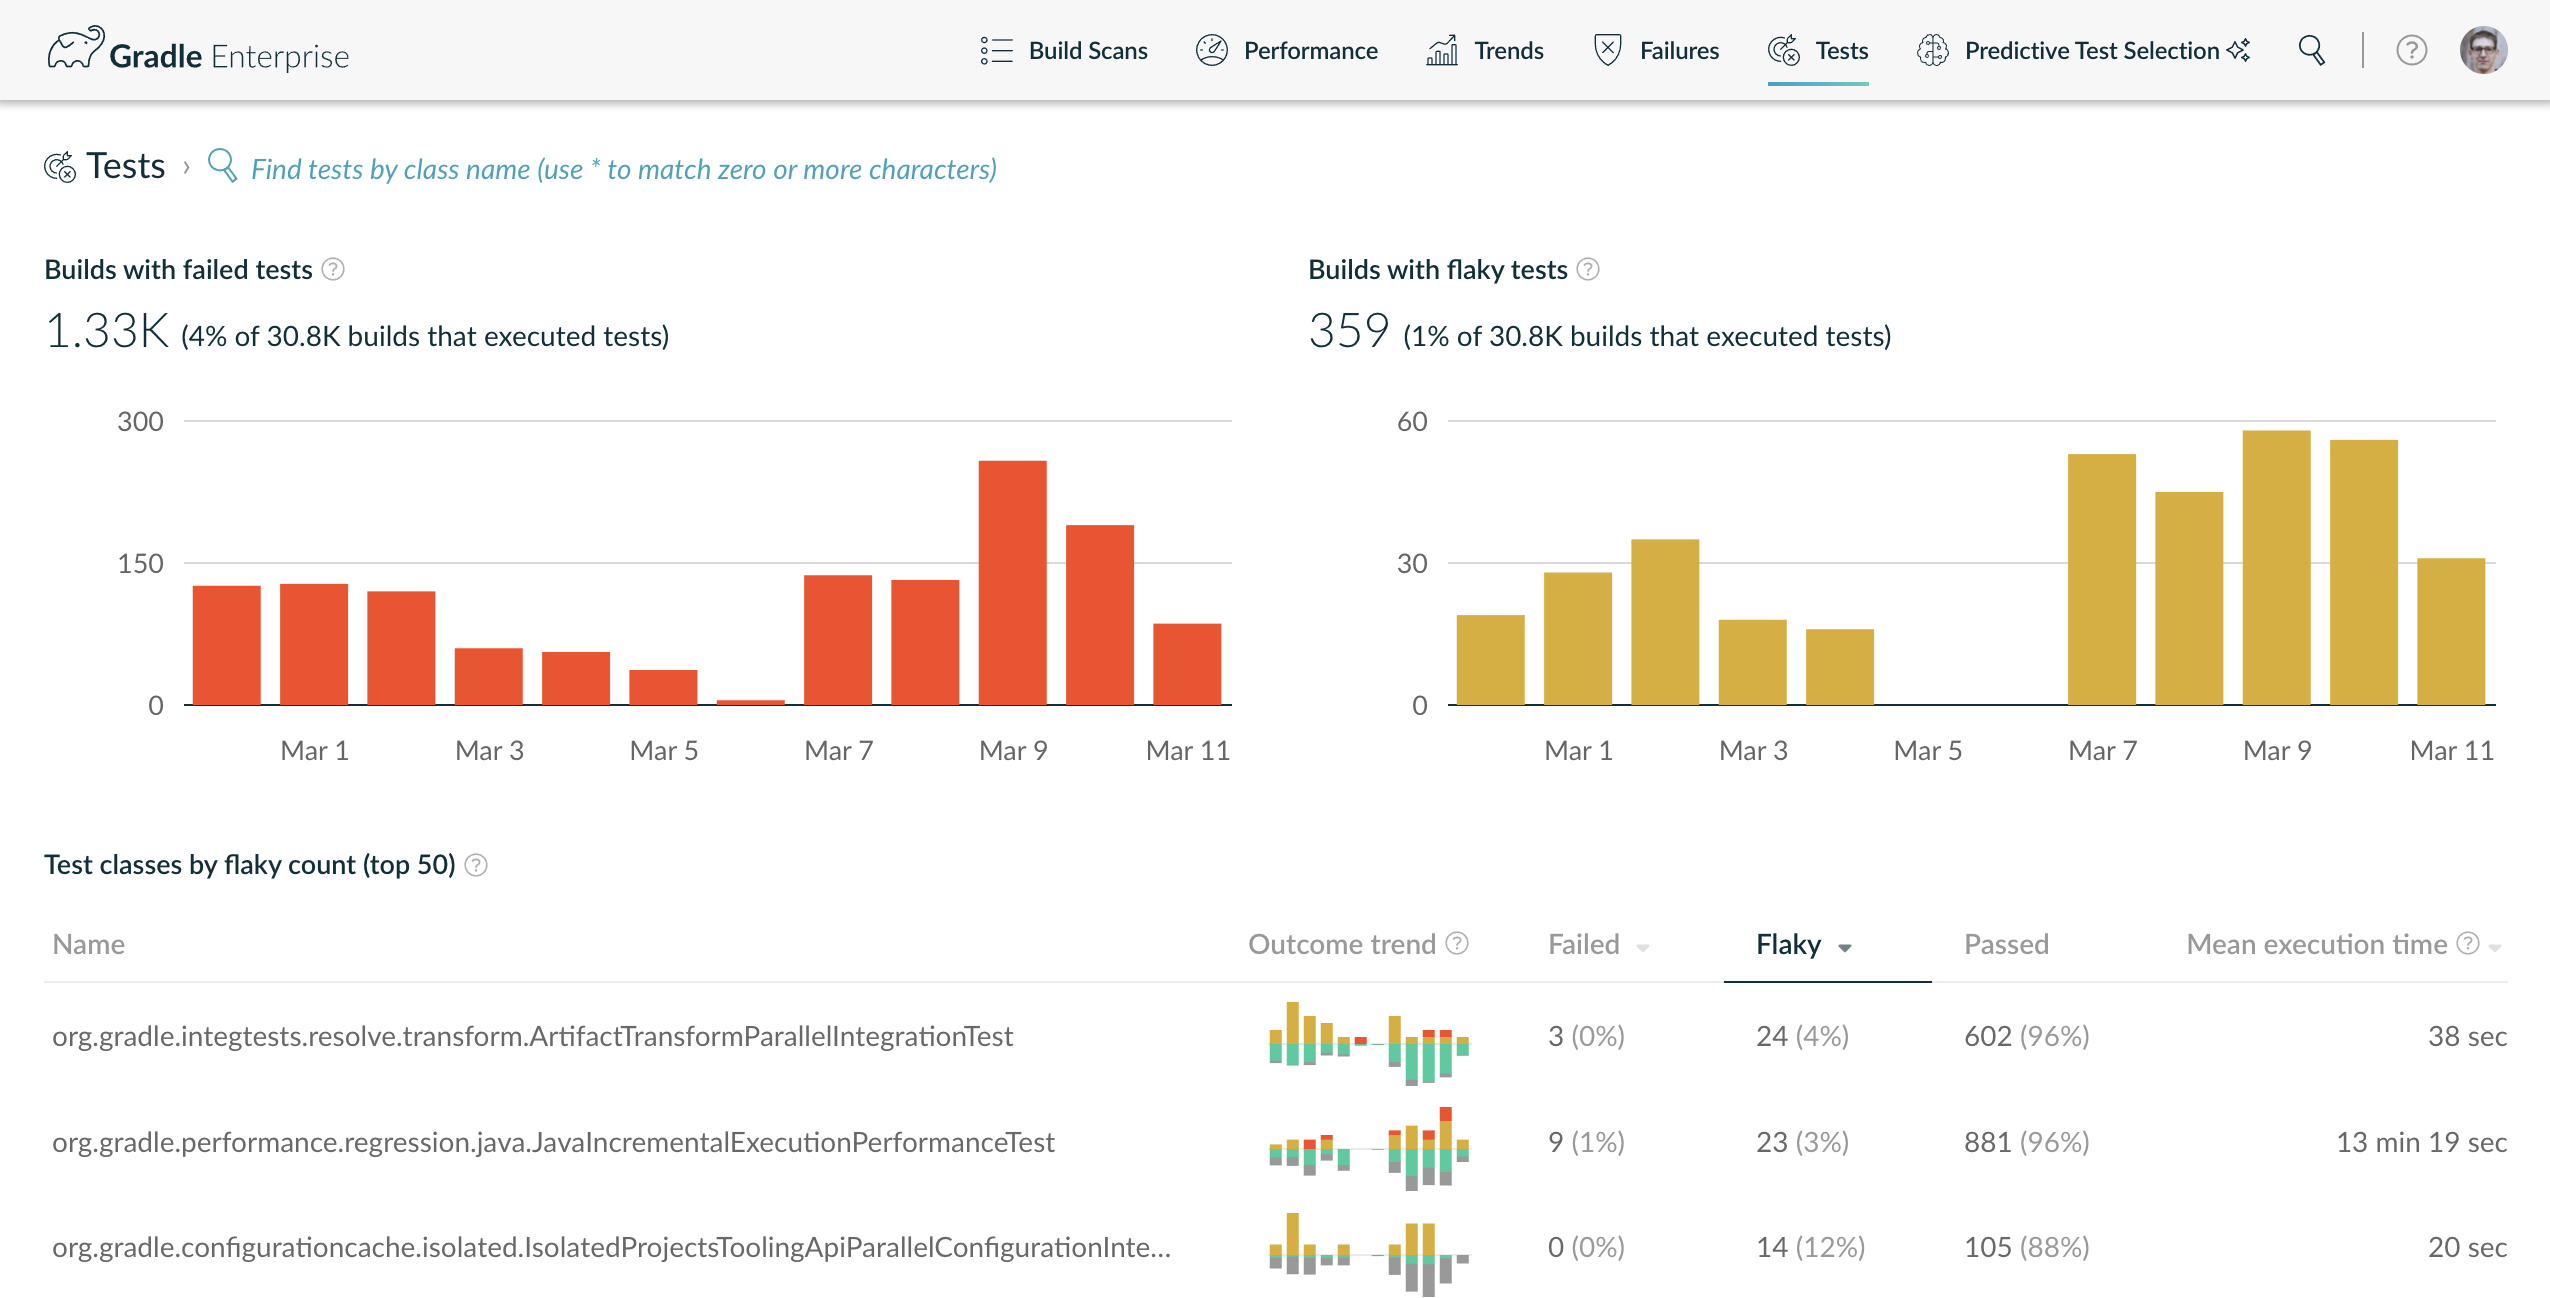
With the flaky test dashboard, you can browse the trend and history of a flaky test case or class. This helps a lot when troubleshooting a flaky test.
Quarantine Too-flaky Tests #
Is retrying failed tested enough? The answer is, unfortunately, no. Some tests in the Gradle codebase are so flaky that sometimes they fail even after rerunning two or more times. These flaky tests are usually caused by flawed production code or test infrastructure, and severely harm developer productivity.
In Gradle, when we find such “too-flaky” tests, we quarantine them. Quarantine means these tests are isolated from the CI pipelines for developer feedback. In other words, they disappear from developers’ sight and won’t block developers anymore.
Where do they go? Do we lose the test coverage for these “too-flaky” tests? No, they are collected and executed in a nightly CI job (we call it Flaky Test Quarantine) that runs once per day, like this:

The “too-flaky” tests are quarantined by manually adding a custom @Flaky annotation onto the test class or method once we see any occurrence.
We also introduced three strategies to select the tests to run:
EXCLUDE: All tests excluding the@Flakytests are selected to run. This is the default strategy for normal CI pipelines.ONLY: Only@Flakytests are selected to run. This is the strategy forFlaky Test Qurantinejob.INCLUDE: All tests including the@Flakytests are selected to run.
(For how to implement the strategies with different test frameworks, please see the Javadoc in @Flaky annotation.)
Fix Flaky Tests #
Everything above doesn’t solve the real problems in flaky tests - it only hides the problems and gives you a false sense of security. Action must be taken to fix the flawed code, i.e. the root causes of the flaky tests.
Thanks to the test dashboard in Gradle Enterprise Flaky Test Detection feature, we can easily:
- Count the number of all flaky tests.
- Order all flaky tests by the frequency they happen.
- Browse the history of a specific flaky test. This is important because we can easily identify the person who introduced the flaky test.
We review all flaky tests once per week and take action to keep their total number as low as possible. Here’s how we do the review:

In this way, most new flaky tests are noticed and assigned immediately. The flaky tests that can’t be assigned will be collected and fixed on “flaky fix-it day.” The “flaky fix-it day” is a 1 or 2-day hackathon we organize when the flaky test number exceeds a certain threshold (for example, 1% of the total test number). During flaky fix-it day, all dev teams work together and focus on fixing accumulated flaky tests.
Summary #
Flaky tests are painful, but measures can be taken to prevent them from harming developer productivity. This blog describes the measures we take in the development of Gradle to get flaky tests under control: retry all failed tests, quarantine the too-flaky tests, and fix the flaky tests through teamwork.
Feedback #
Let us know if you have any questions on our forums or Gradle Community Slack.