How Gradle Works Part 2 - Inside The Daemon
Table of Contents
Introduction
Previously on How Gradle Works:
This is the second blog of the series How Gradle Works.
In this blog we’ll explain what happens inside the Gradle Daemon JVM.
Why We Need Gradle Daemon? #
In the last blog, we mentioned that Gradle starts a Gradle Daemon JVM (“the daemon”) to run the build.
The userguide explains why we need the daemon.
The Daemon is a long-lived background process that reduces the time it takes to run a build. The Daemon reduces build times by:
caching project information across builds
running in the background so every Gradle build doesn’t have to wait for JVM startup
benefiting from continuous runtime optimization in the JVM
watching the file system to calculate exactly what needs to be rebuilt before you run a build
The Gradle daemon was introduced in Gradle 3.0 and became mature over the years. It’s enabled by default, and we don’t recommend disabling it under any circumstances.
What Happens in the Daemon? #
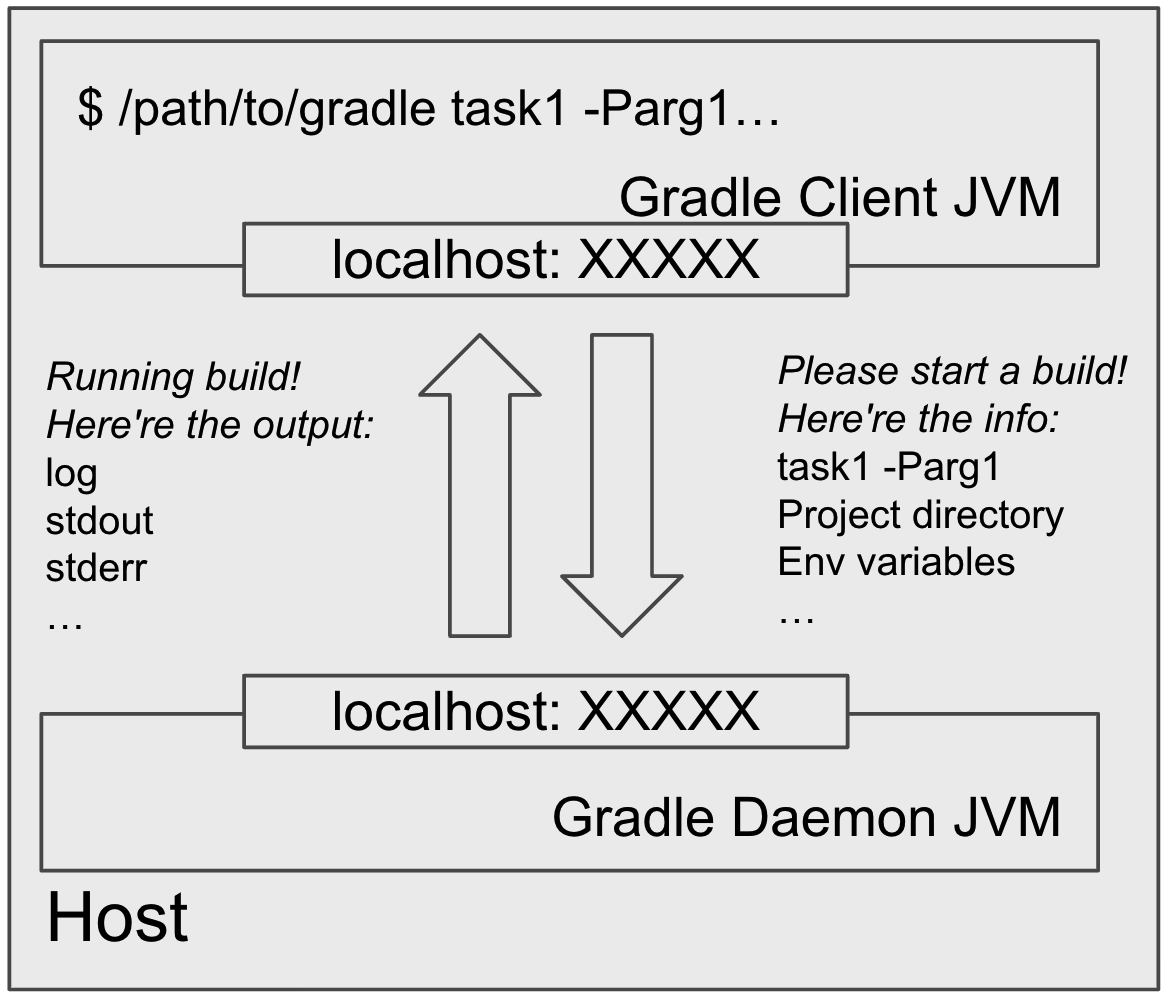
After Gradle Client JVM (“the client”) connects to a compatible idle daemon, it sends the necessary build information (command line arguments, project directory, env variables, etc.) to the daemon.
The daemon then starts running the build and sends build output (logging, stdout/stderr, etc.) back to the client.
The communication happens via a local socket connection.
But what exactly happens inside the daemon?
The userguide explains that there are three phases in a Gradle build: Initialization, Configuration, and Execution.
Initialization Phase: Creation of Build Objects #
Now that the daemon knows everything about the build, it starts creating the internal representations for the build. Because Gradle runs on the JVM, these representations are Java objects.
For example, the whole Gradle build invocation is represented by a Gradle instance. The configuration required to configure the project hierarchy is represented by a Settings instance. There is a Project instance corresponding to each project we’re trying to build.
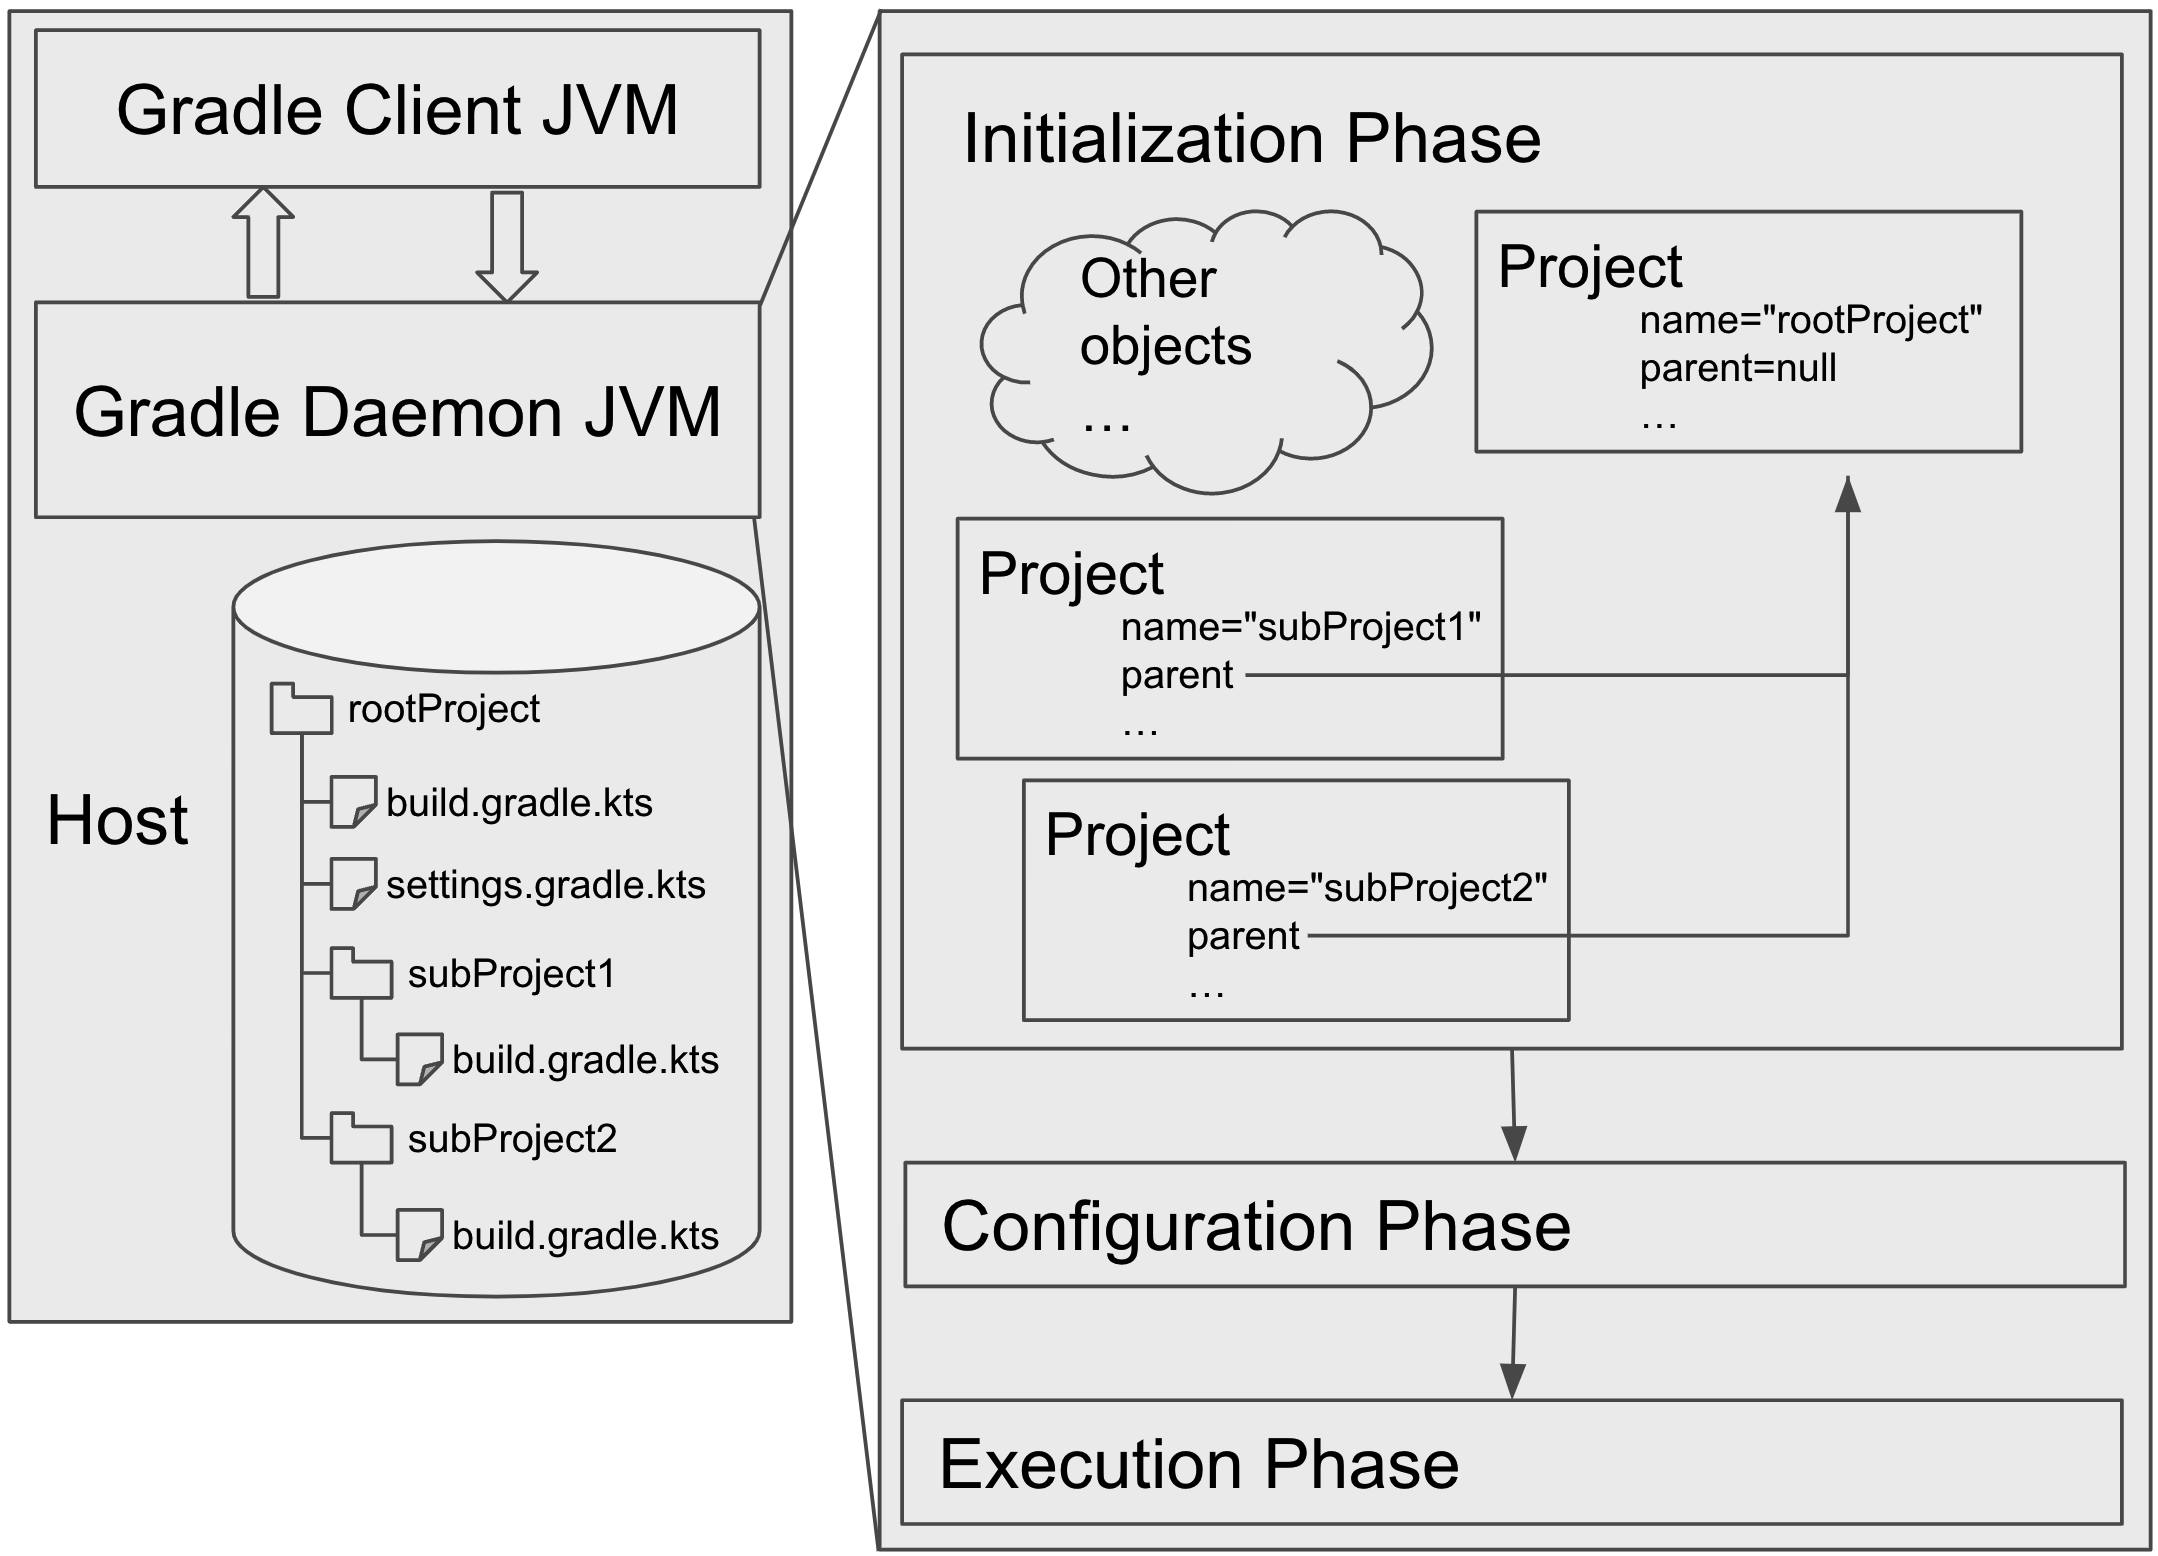
Gradle, Settings and Project are also the default delegation of init, settings and build script.
This means these objects can be later interacted with in the build script. For example, when we say println(name) in a build script,
we are actually calling Project.getName() method on the Project instance.
Configuration Phase: Build Script Execution #
After the necessary JVM objects are created, Gradle will load and execute the build scripts in the daemon.
A build script is usually named X.gradle (Groovy DSL) or X.gradle.kts (Kotlin DSL) in the project directory.
Groovy and Kotlin are both JVM languages, meaning they can run seamlessly inside a JVM (i.e., the daemon JVM).
For example, the following Groovy build script creates a Groovy Closure instance and passes the Closure instance to Project.repositories(Closure) method on the Project instance created in the previous initialization phase.
repositories {
    mavenCentral()
}
Don’t worry if you don’t fully understand build script execution at this stage. We’ll explain the details of build script execution in the next blog of this series. For now, we can simply understand Gradle as an interpreter that executes the build script line by line, top to bottom.
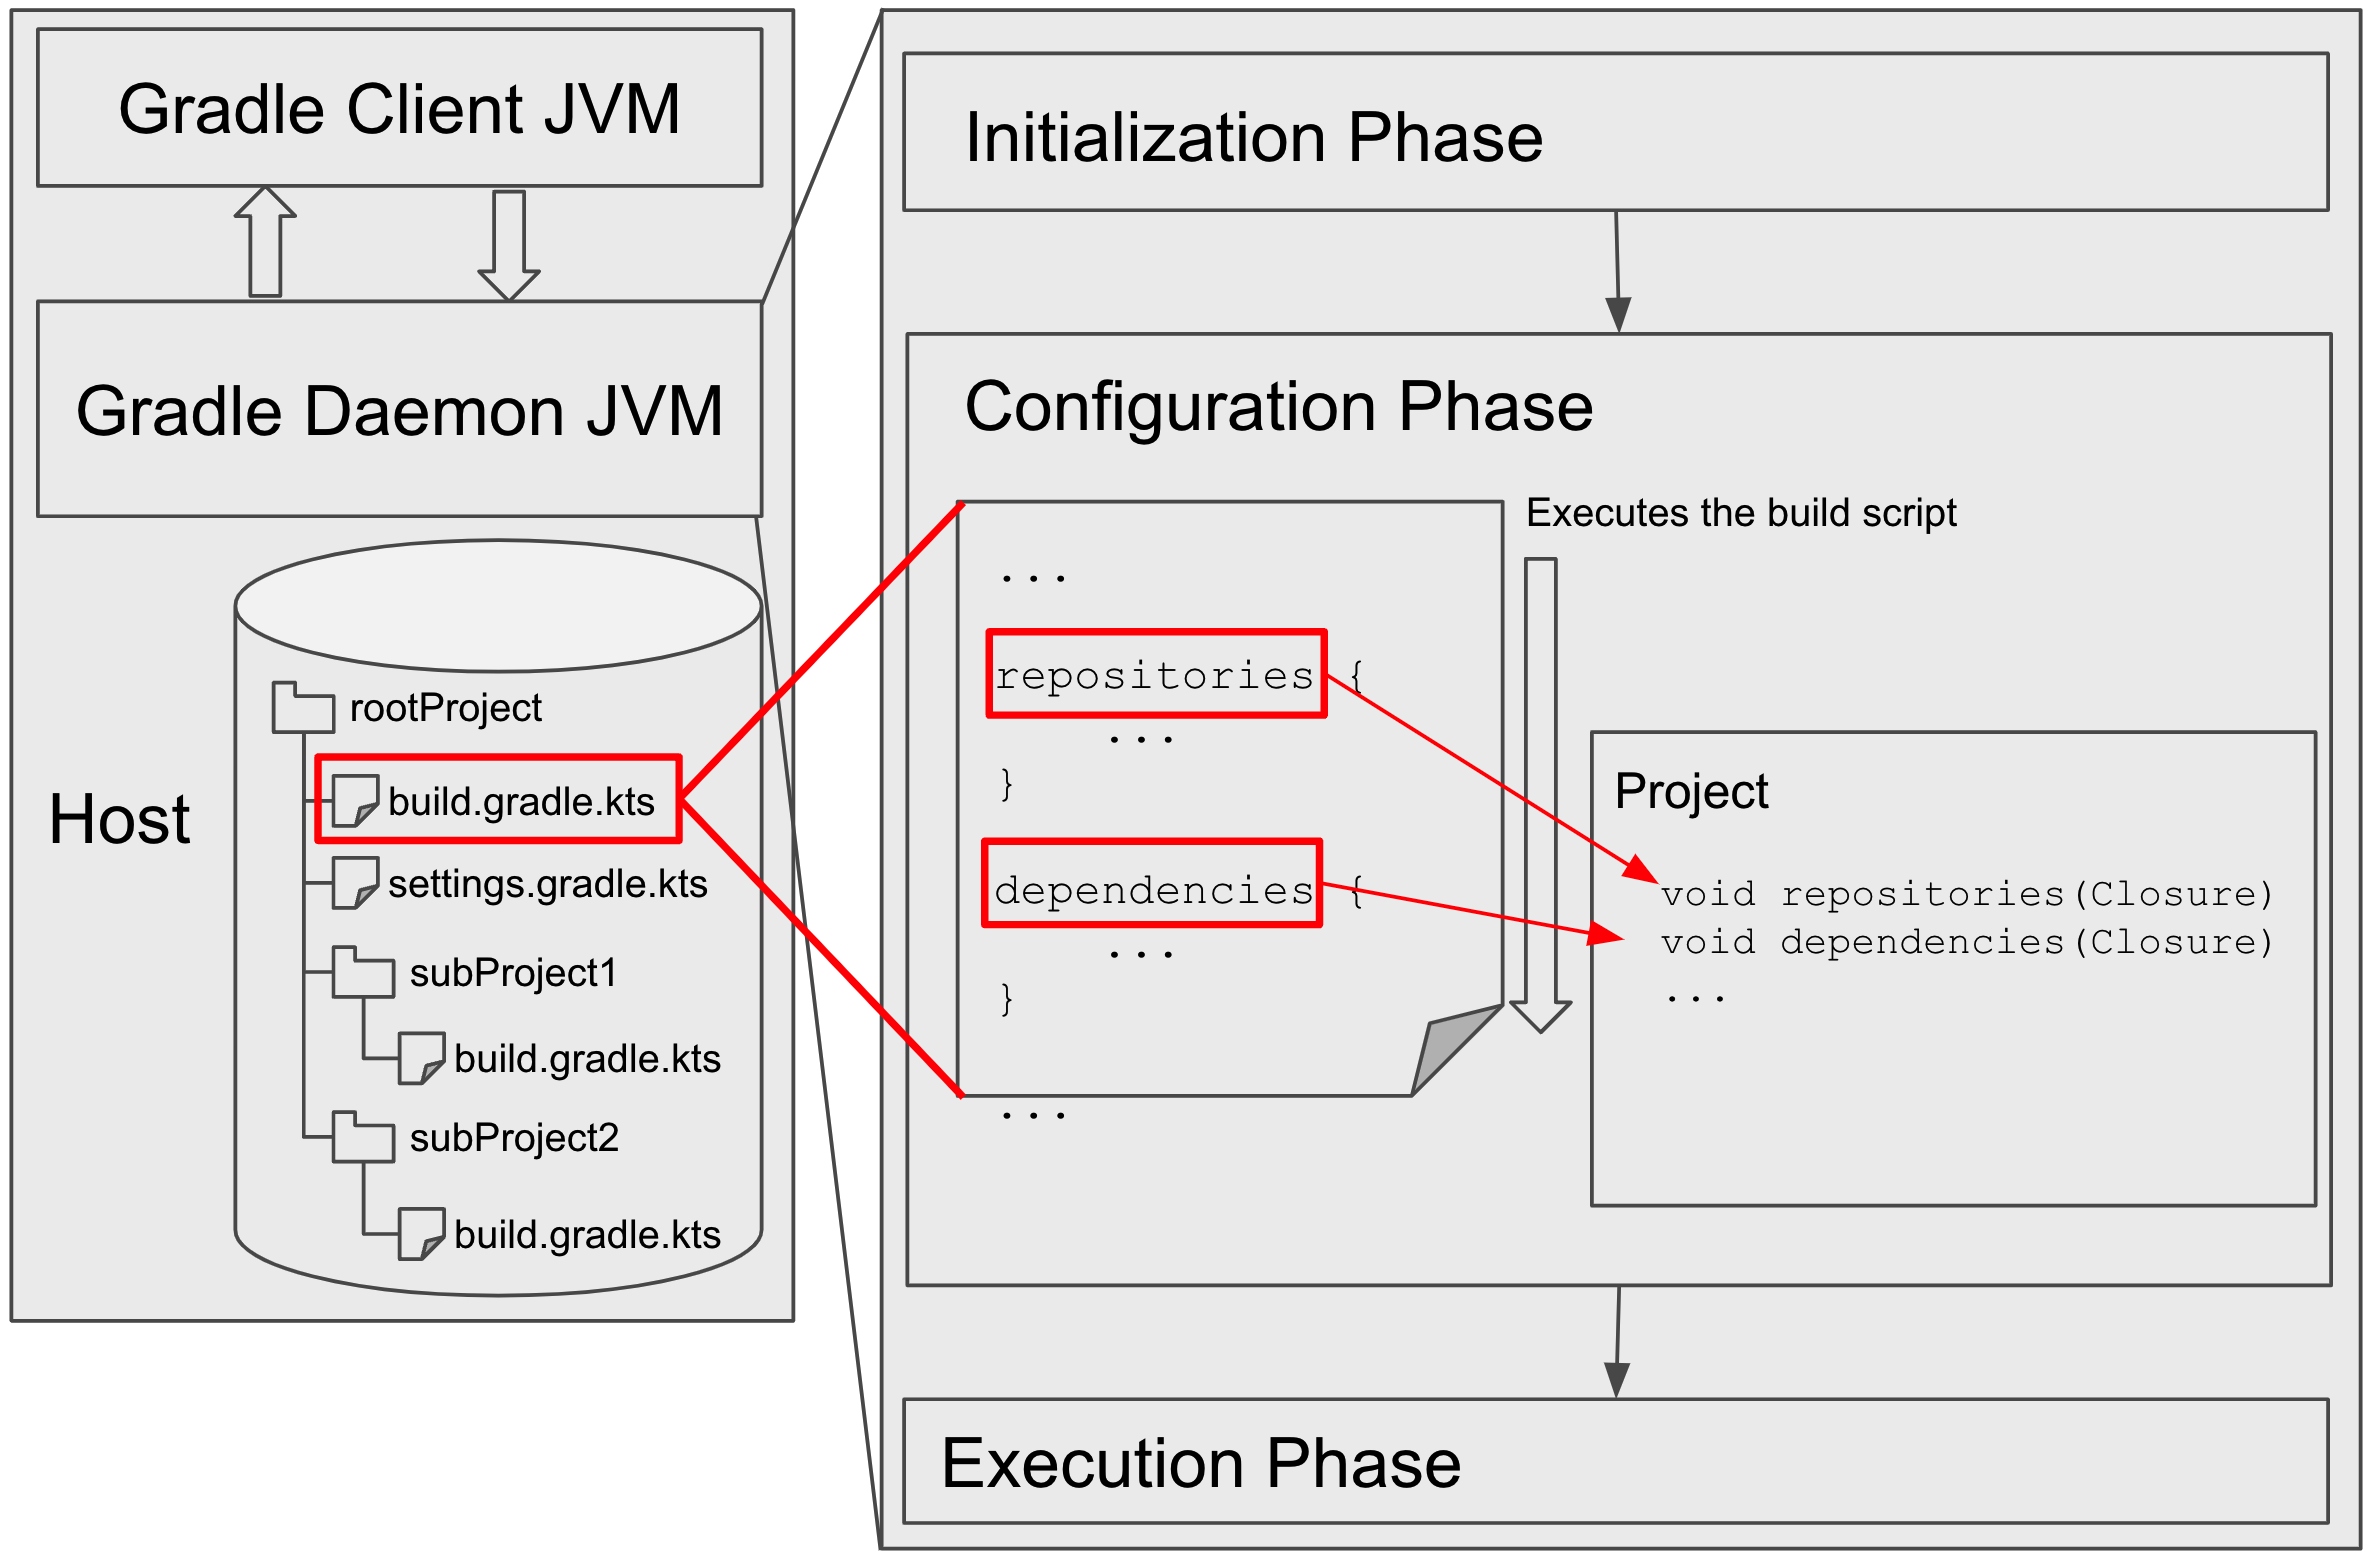
The build script populates the data structures for the build inside the daemon JVM.
For example, the following build script snippet registers a hello task into Gradle’s task container data structure (i.e., class TaskContainer), which means there will be a Task instance created when needed.
This process is usually called “configuration,” i.e., configuring the data structure; that’s why this phase is called the “configuration phase.”
tasks.register("hello") {
    doLast {
        println("Hello world!")
    }
}
After the build script execution finishes, the build data structures are configured with the necessary data for the build. Now we are ready for the next phase: select some tasks and execute them.
Execution Phase: Execution of Selected Tasks #
After the configuration phase, Gradle has all the necessary data for the build stored in the daemon JVM.
Then, it determines the subset of tasks to be executed by the arguments passed to the gradle command
and executes each of the selected tasks.
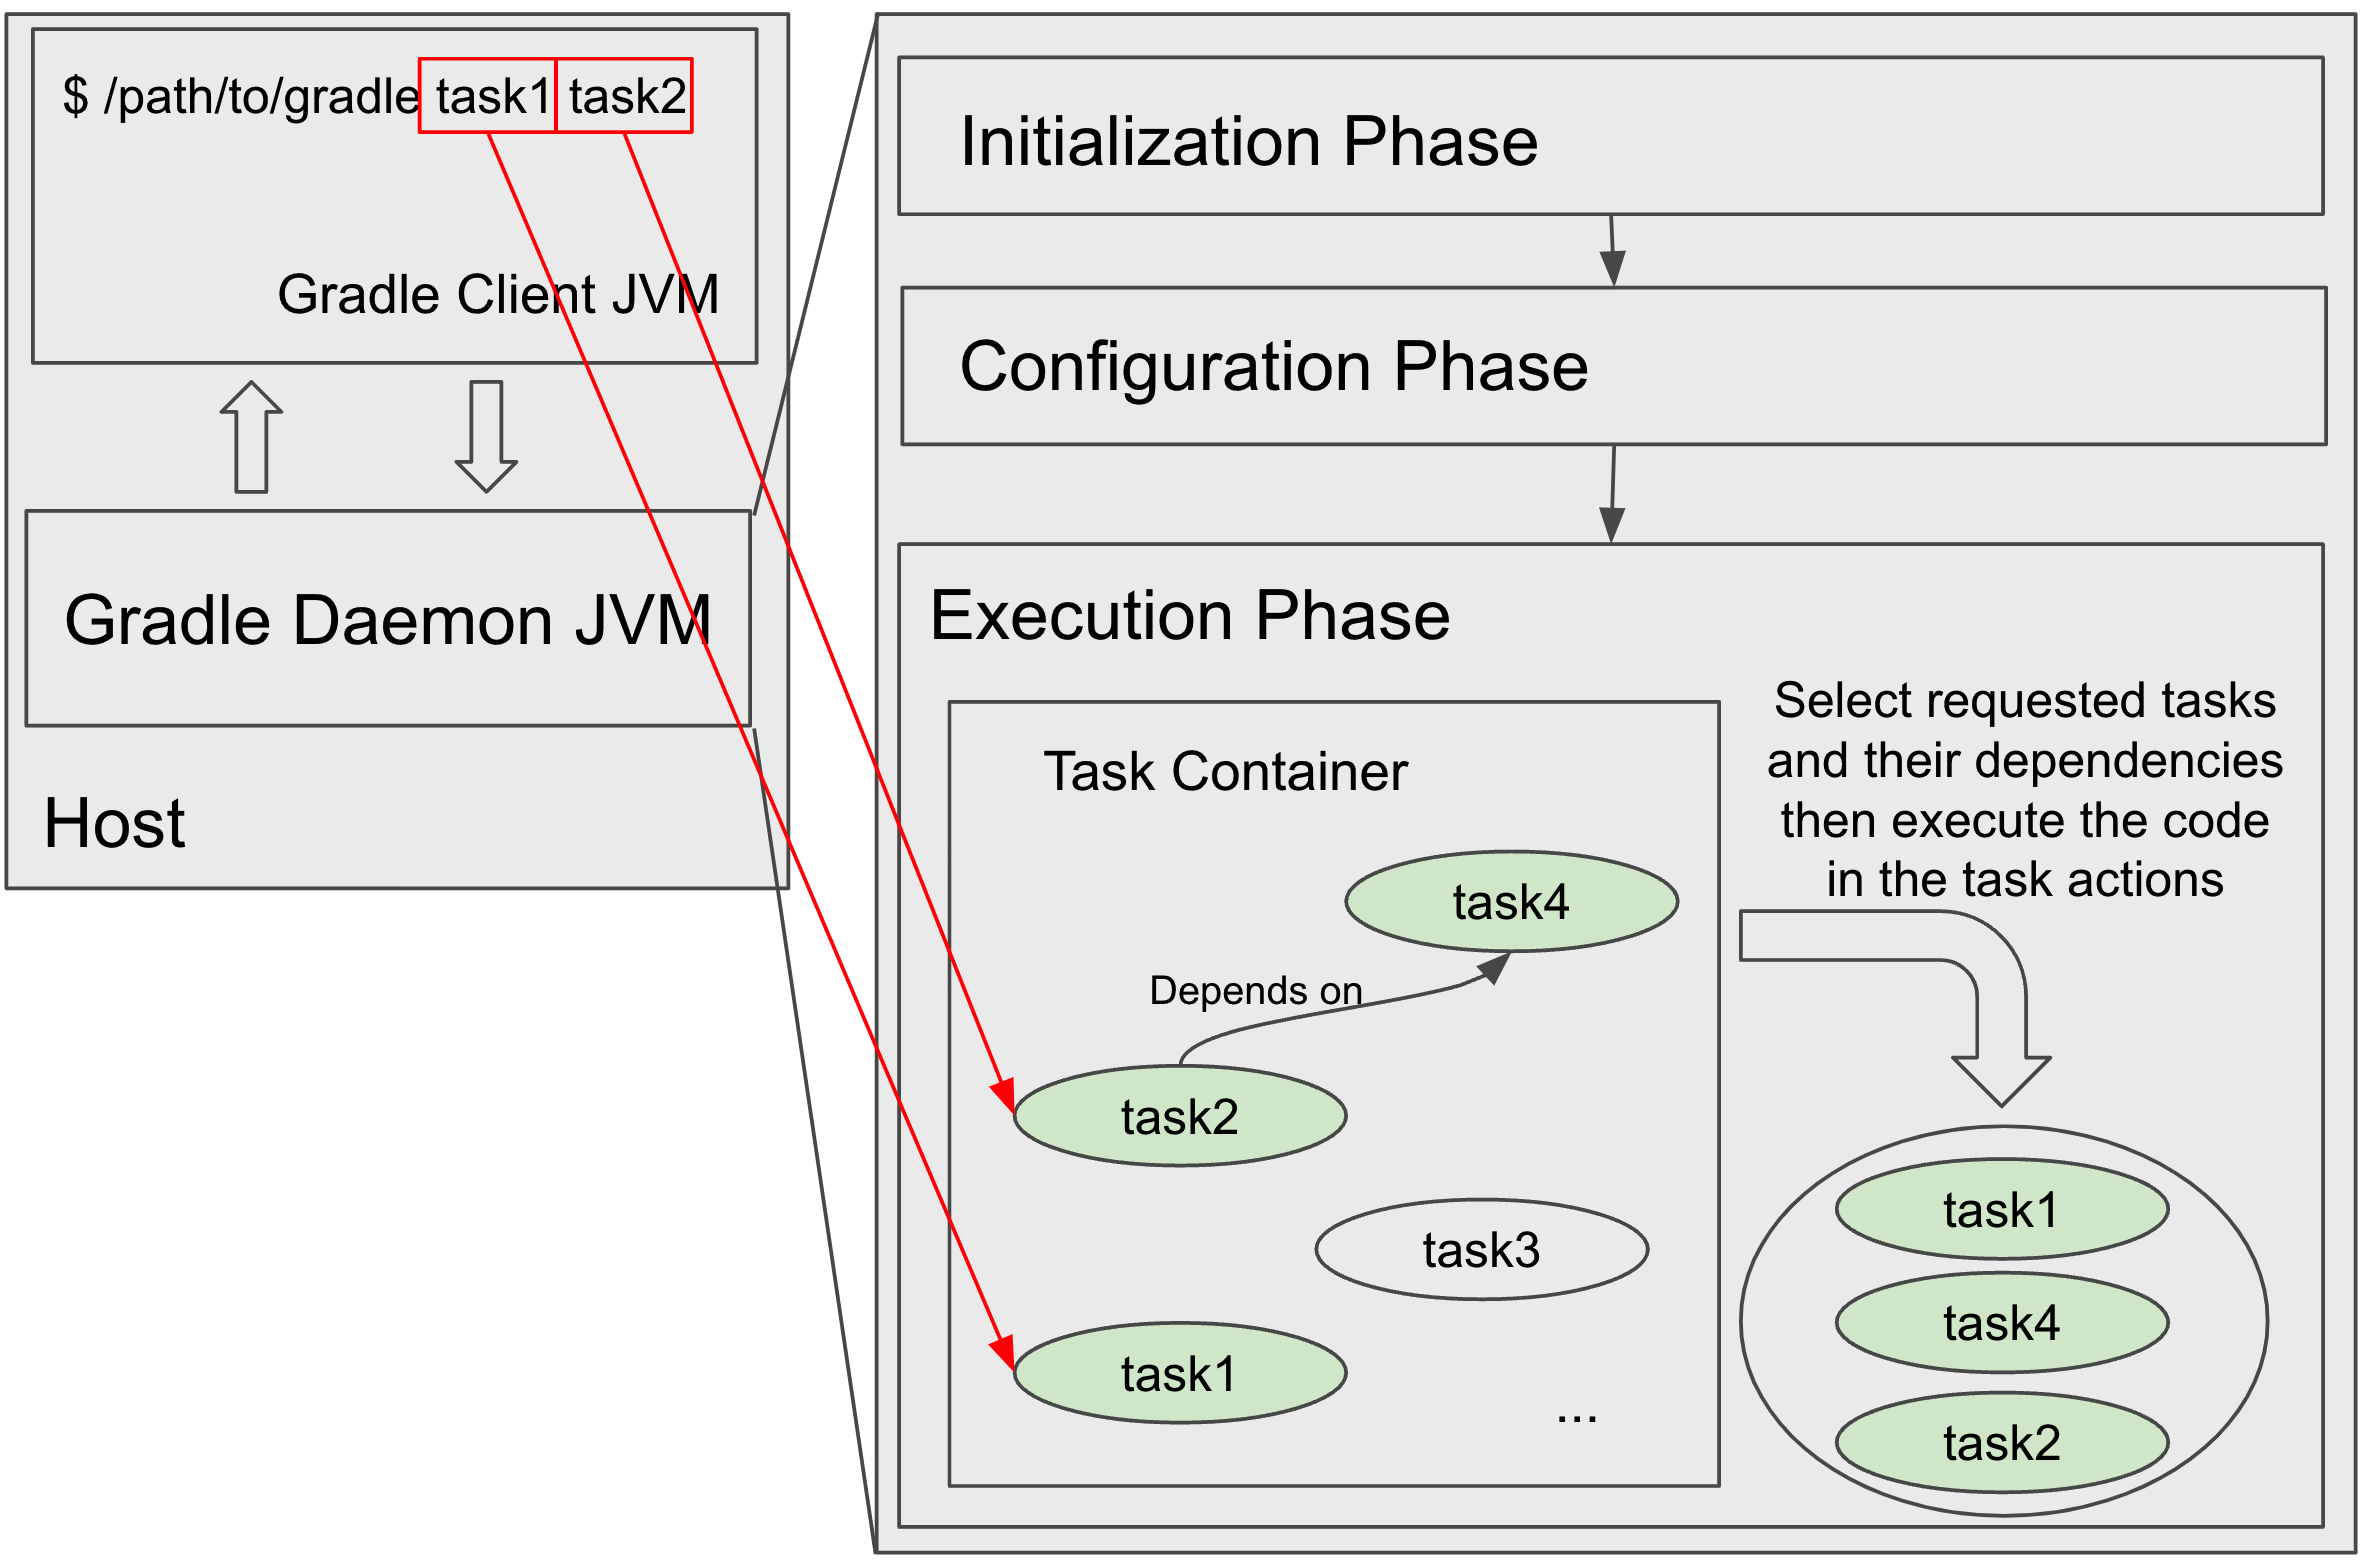
Each Task has a list of actions made up of chunks of code to be executed.
For example, if you wonder what the Test task does,
just search @TaskAction in the source code, you’ll find:
class Test {
    ...

    @TaskAction
    public void executeTests() {
        ...
    }
}
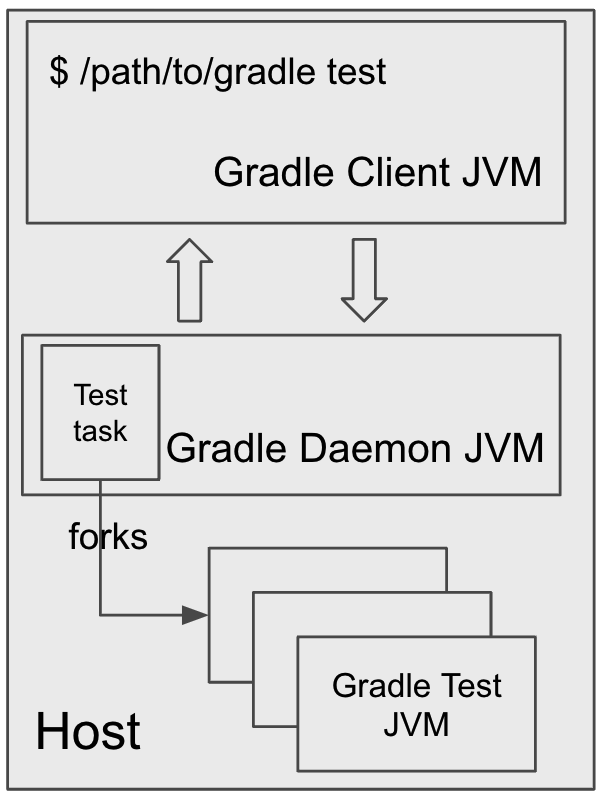
When we say “a task is executed,” we mean “the code in its actions is executed in the daemon JVM.” The task actions are always executed in the daemon JVM, but the actions can decide to fork some new JVMs and run some code in the forked JVMs.
For example, the Gradle Worker API provides a way to break up the execution of a task action into pieces and then execute them in child processes.
Another example of custom task actions forking extra JVMs is
Test task.
The Test task action is executed in the daemon JVM but during the execution,
it forks a few JVMs and runs the test code inside the forked JVMs to avoid the test code interfering with the daemon JVM.
At the end of the build, the daemon will do some extra stuff, like executing callbacks, reporting errors, if any, publishing build scans, etc.
After that, the Gradle Client JVM disconnects from the daemon and exits.
The daemon is now ready for the next build invocation.
What’s Next #
In the next blog of the series, we’ll explain what happens under the hood of build script execution.